A practical way to save and keep your data safe.
In this period in which the finances of companies and public administrations are put to the test, it is easy to find directors who think of security as a cost, and not as a real need for their own infrastructure.
It is therefore easy to imagine a fairly worrying scenario where the structure is not really up to par.
Unsuitable servers, software not updated, no possibility of changing the platforms and so on and so forth.
In reality certain contexts are not rare and it is therefore necessary to prepare to act even in the face of scarce resources.
In general, implementing a software solution on non-dedicated hardware, such as the solution we will analyze below, can be concretely useful in the following cases:
- Lack of funds
- Need to adopt a "buffer" solution without additional costs in case of extreme emergency
- Need to defend small machines (such as laptops) and not be able to adopt "classic" solutions, due to exceptional conditions.
- Need to reconfigure an isolated network, for example a laboratory, without having to purchase additional hardware, while maintaining the flexibility of the network itself.
These are just a few examples, but the possibilities are many.
Depending on the case, if you want to adopt the solution based on Windows, you will not have a considerable drop in performance.
The situation changes if you want to adopt OPNSense.
OPNSense advice if tests have never been carried out on the applications and systems to be defended, whereas Windows in the case in which the limit of its applications is well known and how to secure the code.
Is it possible, with a little patience, to save on hardware Firewall and UTM (however strongly recommended), to go and protect a "desperate situation"?
Hardware Firewalls are equipment specifically designed to host an operating system (the "heart" of each computer), usually in a "hardened" version.
By "hardened" (OS) Operating System (OS) is meant a System to which specific patches and bugfixes have been applied, or specific corrections and modifications, which allow the system itself to withstand numerous types of attacks.
UTM (Unified Threat Management) are machines that can handle numerous types of attacks in a centralized manner.
The user can, for example, set rules for both the Firewall and the anti-spam filter directly from a single interface, usually accessible via browser.
Obviously in a "desperate situation" we have nothing of this at the "hardware" level, so we will have to work hard to find a solution to a rather difficult problem.
What can help us is "virtualization"
Virtualization is a specific technique that allows you to "abstract", or make available in virtual mode, hardware components.
To better explain the concept, let's imagine we have a processor (the component that physically executes the operations) of 20 "cores" (the various units that perform the calculations in the processor).
Through virtualization we can "separate" for example 10 cores and dedicate them to another operating system.
The same concept of "dedicating" or "abstracting" a portion of hardware to other software can be applied with RAM, network cards, etc.
This allows you to have a "host" operating system (the main operating system) and multiple "guest" systems (virtualized systems) on the same machine, simultaneously operating.
The component that allows this "abstraction" is called "Hypervisor".
In the market you can find many virtualization systems, which in some cases have licensing costs prohibitive for our "desperate situation".
In our case, the choice of the virtualization system falls on the VirtualBox software, developed by Oracle.
VirtualBox is an Open Source software, ie its code is open, that is readable and editable by anyone.
But why can virtualization help us?
To answer this, we must think of the "concept" of UTM.
Conceptually, a security system can be simplified as a "black box" with two cables, one for entry and one for exit.
The input cable connects directly to the Internet, and from there come packets (or data and connections) of which we do not know the nature, whether malicious or legitimate.
In the black box the check takes place, and the malicious packets are discarded, while the legitimate ones are passed through the output cable, to the machine that contains the actual service (a website, for example).
It is therefore essential to keep in mind three fundamental aspects:
- The "black box" must be "in front" of the machine to be protected
- The "black box" must be connected to the internet
- The "black box" must filter incoming packets
This type of configuration seems to be perfect for our case, which is a virtual machine, which becomes our "black box".
The fact that VirtualBox is Open Source, helps us not to come across unexpected costs, and to help us not have "bad surprises", we will not install the VirtualBox "Extension Pack" package.
The solutions proposed here are actually two, with relative advantages and disadvantages:
- Solution based on Windows 7 (yes, exactly on Windows 7)
- Solution based on OPNSense
The solution based on Windows 7 has the advantage of having a minimum resource consumption and a connection speed equal to that of the "host" machine directly connected to the Network.
The disadvantage of having Windows 7 is that by default it has no Intrusion Prevention System (a system that automatically detects and blocks any malicious packets).
The OPNSense-based solution has the advantage of having many control tools and can be easily configured as an Intrusion Prevention System (IPS).
The disadvantage of OPNSense is its own tools, which means that the impact on hardware resources is greater, and since IPS must control the data flow, the impact on connection speed will also be significant.
OPNSense was chosen with respect to pfSense (a system similar to OPNSense) for its analysis system.
PfSense uses a component called "Snort", which analyzes packets in transit and is rather heavy, especially if installed on a virtual machine.
OPNSense uses Suricata or another package analysis system that exploits multithreading, or a technique that allows multiple processes to be performed simultaneously by the processor.
To date Suricata is a NIDPS system, or Network Intrusion Detection and Prevention System (exactly what we need, as it manages to prevent threats and not just identify them), while Snort is a NIDS, or a Network Intrusion Detection System.
This combination is preferable, especially in a virtual machine where particular attention must be paid to the impact these systems can have on overall performance.
The system to be defended is Metasploitable, which is a virtual machine purposely built to be vulnerable.
In this case, let's imagine that Metasploitable is the system to be protected:

We therefore analyze how to install and implement these two solutions.
The initial scenario sees our system without defenses.
Let's analyze it using Kali Linux, a distribution specially built to help Penetration Testers, that is people who pierce systems for work, to find vulnerabilities and to heal them.
First, let's do a quick scan with nmap (a very effective tool that allows you to discover open ports and other information related to the target system):
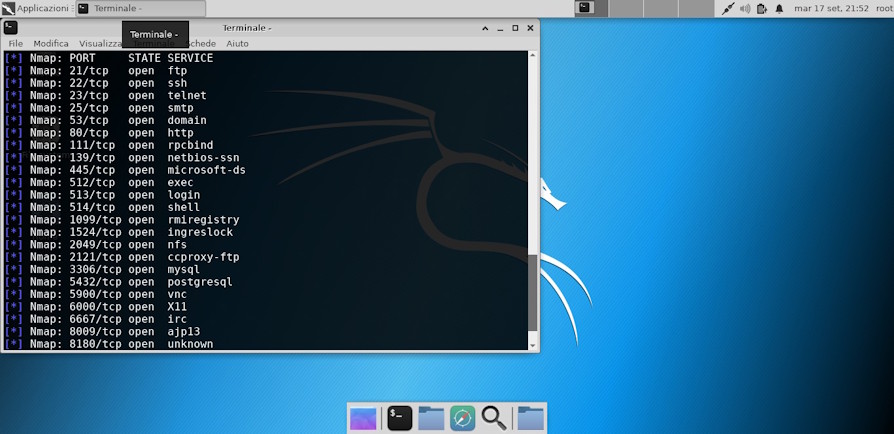
As you can see, the situation of our system is disastrous.
The many open doors expose machine services, many of them vulnerable.
Let's try to launch an attack on the machine, for this test, since it's only a test, I'll use "db_autopwn", a Metasploit command that simplifies the launch of exploits to the target.
The "db_autopwn" command is deprecated (ie not recommended), and for this test an external module was used that re-implements the command on the latest version of Metasploit.

As you can see, Metasploit managed to open two sessions on the machine:

For the first solution we have Windows 7, installed on a virtual machine.
Let's open VirtualBox and configure two network cards, like this:

We need two network cards, connected in bridge mode, to the network card currently connected to the internet.
We therefore created the "black box" situation, at least at the hardware level.
Let's see how to configure the machine, at software level
First, we need to configure on the first network card, the real connection, ie the IP address and the network gateway (we must therefore ensure that the first network card is working and connected to the internet).

Obviously this configuration is just an example, and in this case Windows is not really connected to the internet.
Once the IP address has been set for the first card, always on the same card we need to enable internet connection sharing

Now, if we wanted to expose services (for example the website) on the internet, click on "settings" and set "Web Server (HTTP)"

Why this configuration?
By activating the internet connection sharing, a fictitious "192.168.137.x" subnet is set on the second network card.
Our machine to be protected, in this case, is set to the "192.168.137.143" IP address, therefore this address must be set in the "Service settings" mask as shown in the previous figure.
Now we confirm everything by clicking on "OK" on the various masks.
Once confirmed, we open "secpol.msc"
On the "IP Security Criteria" icon, by clicking with the right mouse button, it is possible to create a new IP security policy.

In the wizard, we give a name to our configuration and we always go forward, until the filter is created.
At this point we find ourselves in front of a new screen, so we click on "Add", we always go forward to the "IP Filter Lists" screen.
Here we click on "Add"

We need to create the first rule, which means we must block any connection on any port.
To do this, we click on "Add" and we always go forward, in this way we have created a rule that works on any Connection, for any protocol.
We select the newly created rule and move on.
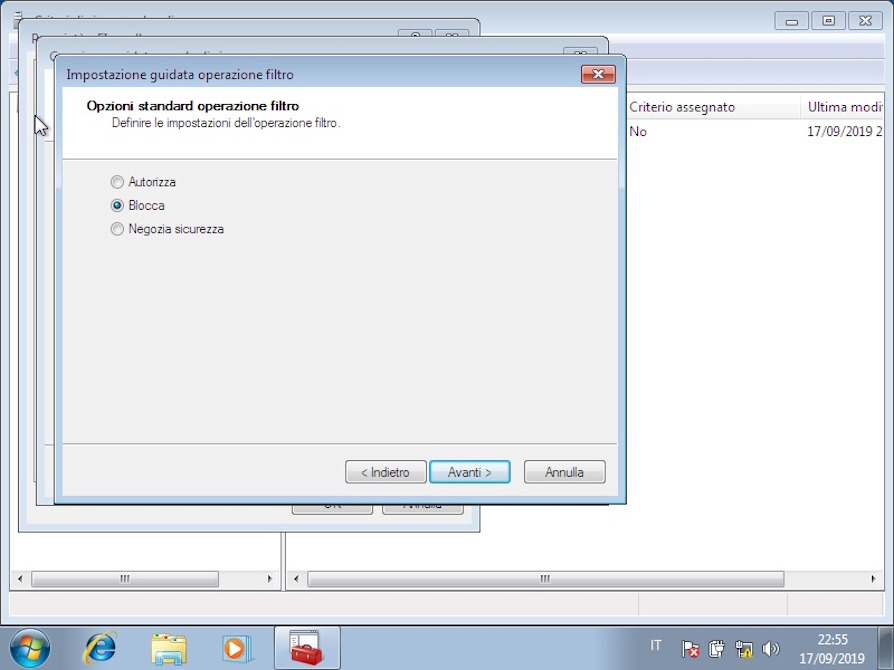
On the next screen (Filter operations), we click on "Add", we give the name "Block" and we click on "Block".
Once the filter operation is created, select it and proceed to confirm the creation of the complete rule.
Now we have just blocked all the ports for all the connections of the machine, since in our case we want to make the website available on the 80 port, we have to create another rule, which authorizes the passage of data on the 80 port.
On the creation of the IP filter, as soon as we arrive on the "Protocols" page we specify "TCP" and in the ports, on the second text field we click on the "this port" option and specify the 80 port.

While in filter operations, this time we have to specify "Authorize".
Once the configuration is complete, right-click on the filter created and then on "Assign"

At this point, we can run our tests again:
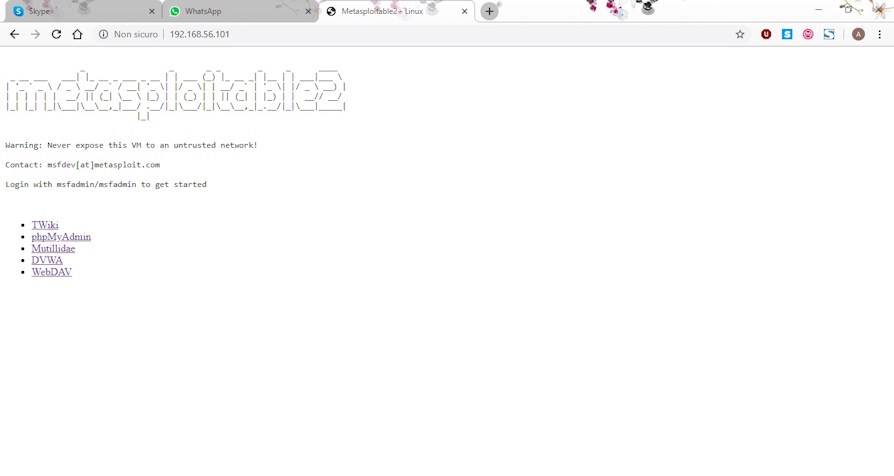
The site is working

The doors are also covered by the "black box" that we have inserted between the internet and our machine.
We then attack our machine again to test if the configuration has changed anything:

As we can see, Metasploit failed to open sessions.
Why do we have this abrupt change in behavior, despite the fact that we have not modified / updated the system?
The reason is inherent in the type of configuration we have set up.
This type of configuration involves the use of connection sharing to create a sub-network, through which it connects to our machine.
If we had only used connection sharing, Metasploit would still have managed to open a session, as although port forwarding was set to 80 (to make the website available from the outside), it would not have prevented “reverse connections ”, Or a connection to a port opened by a client internal to the network to allow the connection of a remote server.
When we attack a machine, what allows the communication of the target to our machine is the "payload", that is a software that connects to our machine, allowing to launch commands and interact with the target, acting as a "bridge" between us and the target.
Since the "classic" ports are already used by the target's normal services, the payload cannot use these ports to communicate.
Consequently, the payload activates a connection on a random port and generally higher than the 10000 which, by connecting to our computer, allows communication between us and the target to be established.
To solve this problem, derived from the fact that generally outgoing connections are not blocked by firewalls, we used the filter described above, to prevent unwanted connections.
In this way, even if the system is not updated, or an exploitable vulnerability exists, the attacker cannot exploit the available exploits because the payloads cannot communicate.
Obviously, this solution does not prevent the exploitation of SQL Injection or other vulnerabilities that do not need a payload to be able to communicate with our machine.
In fact, I remember that package analysis is not available with this solution.
To enable package analysis, we will inevitably have to rely on "Intrusion Prevention" software.
For this situation, OPNSense was identified, which as described above uses Suricata as a package analysis system, and Netmap to decrease the CPU load and optimize network cards.
I would like to draw attention to the fact that there is no change in the "logical" scheme that we have created, nor to the virtualized infrastructure.
Only the operating system of the "black box" changes, to allow the analysis of packages in real time.
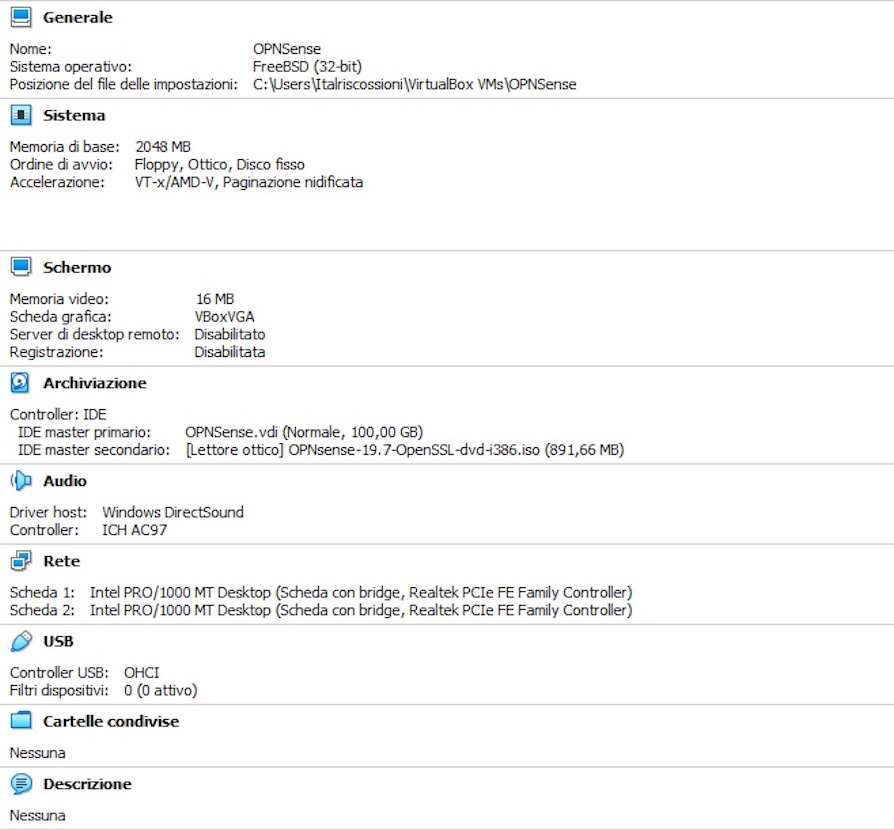
To allow OPNSense to operate at its best, let's dedicate to the 2 GB RAM virtual machine (unlike the first solution, where even a single GB was sufficient).
Here is an example configuration for OPNSense:
When you start the machine, the login screen appears:

The machine we need to protect, therefore, in our case will have "192.168.2.2" IP address and "192.168.2.1" gateway as the IP address.
We can enter the OPNSense configuration, connecting a device to the LAN and, using a normal browser, pointing to the link "https://192.168.2.1"
The following panel will open:

Once logged in, we are in front of the main OPNSense panel:

Let's go to "Services" → "Intrusion Detection" → "Administration" and check all the options:

Click on "apply" and go to "download":

We click on the check mark to select all, then we click on "Enable selected", then reselect everything and click on "Enable (drop filter)".

Finally, at the bottom of the page, click on "Download and update rules".
We therefore check that all the rules are correctly updated, and we have therefore set up package analysis.
To cover all types of cases, we set the "caching proxy".
Proxy caching is a component, already present in OPNSense, which allows Suricata to extend intrusion detection capability.
This is because for encrypted protocols, such as HTTPS, Suricata would not be able to decipher the data in transit in real time.
To avoid this problem, proxy caching allows you to act as a bridge between the external network and the visited website.
As a bridge, the packets are decrypted by the proxy, which only then retransmits them to the actual service.
Obviously this operation also occurs in a specular manner.
This allows packages to be controlled by Suricata.
The software that allows all this is called "Squid".
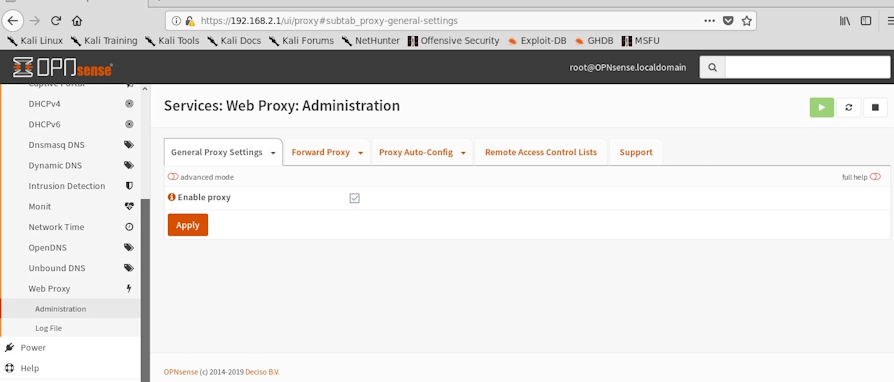
To enable squid on OPNSense, go to "Services" → "Web Proxy" → "Administration", check "Enable Proxy":
Then we go to "Forward Proxy" and enable the three checkmarks as in the figure.

Although these solutions represent a valid alternative for those realities that cannot provide for the purchase of hardware-based tools, I still recommend the use of the hardware solution.
In conclusion, if we really want to sleep soundly, I always recommend installing the latest updates for the operating systems used, writing code also testing the various vulnerabilities using automatic and non-automated tools, and finally recommend changing one's mindset towards security: security is not a product, never has been and never will be, but it is a process and as such needs to be followed, standardized, applied and controlled.
To learn more:
https://www.offensive-security.com/metasploit-unleashed/requirements/
https://en.wikipedia.org/wiki/Internet_Connection_Sharing
https://wiki.opnsense.org/
https://it.wikipedia.org/wiki/Squid
https://it.wikipedia.org/wiki/IPsec
https://it.wikipedia.org/wiki/Virtualizzazione
https://www.virtualbox.org/wiki/Documentation
Photo: US Marine Corps